
WireGuard is an application that can provide a secure virtual private network (VPN), it is simple to use and setup. It uses strong cryptographic protocols and algorithms to cyph data. Designed exclusively for the Linux kernel, it can be deployed on Windows, macOS, FreeBSD, iOS and Android.
In our case we will use CentOS 8.3 for WireGuard setup.
How to set up the WireGuard VPN client:
- How to Install the WireGuard Client on CentOS
- How to create a private and public key
- How to run WireGuard

Installing WireGuard Client on CentOS
Client installation is similar to server. Log in to your Linux server, after logging in, add the EPEL and Elrepo repositories to install the kernel modules and WireGuard tools.
sudo dnf install epel-release elrepo-release -yNow let’s install WireGuard from epel repository:
sudo dnf install kmod-wireguard wireguard-toolsGenerating Private and Public Keys
WireGuard works by encrypting the connection using a pair of cryptographic keys. The key pair is used by passing the public key to the other party, which can then encrypt its message so that it can only be decrypted with the corresponding private key. To secure two-way communication, each side must have its own private and public keys, since each pair provides only one-way messaging.
Generate a client public and private key pair by running the following command:
wg genkey | tee private.key | wg pubkey > public.keyAfter that, create a client configuration file, in the following directory:
sudo nano /etc/wireguard/wg0.confIn the file type:
[Interface]

PrivateKey = <contents-of-client-privatekey>

Address = 10.0.0.1/24

PostUp = iptables -A FORWARD -i wg0 -j ACCEPT; iptables -t nat -A POSTROUTING -o eth0 -j MASQUERADE

PostDown = iptables -D FORWARD -i wg0 -j ACCEPT; iptables -t nat -D POSTROUTING -o eth0 -j MASQUERADE

ListenPort = 51820

[Peer]

PublicKey = <contents-of-server-publickey>

AllowedIPs = 10.0.0.2/32
Notes: In the publickey line insert the server public key that we generated in the previous article and on the private key insert the client private key.
WireGuard Startup
To start the connection, type the following command:
sudo wg-quick up wg0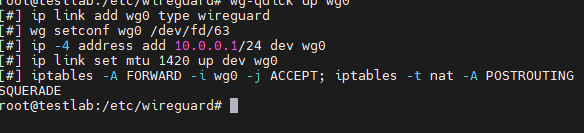
Now the client can communicate with the server, you can ping the server from the client with the command
ping 10.0.0.1
To find out the connection status, run the following command:
sudo wg showYou will get all the connection details as shown below

Congratulations! Your client computer now has access to the VPN network.
Conclusion
WireGuard is a modern, fast, and secure VPN solution that uses state-of-the-art cryptographic protocols to protect your data. This guide showed you how to install and configure the WireGuard VPN client on CentOS 8.3, generate cryptographic keys, create the client configuration, and establish a secure connection with a WireGuard server. Thanks to its simplicity and efficiency, WireGuard is an excellent choice for securing your network communications across multiple platforms.
FAQ
- Q: What makes WireGuard different from other VPN solutions?
A: WireGuard is designed to be lightweight, fast, and easy to configure, using modern cryptography that is simpler and more efficient than traditional VPN protocols like OpenVPN or IPSec. - Q: Can WireGuard be used on operating systems other than CentOS?
A: Yes, WireGuard supports Linux, Windows, macOS, FreeBSD, iOS, and Android, making it a versatile VPN solution for various devices. - Q: Do I need to generate new keys for each client?
A: Yes, each client requires a unique private and public key pair to establish a secure and encrypted connection with the server. - Q: How can I check if my WireGuard VPN connection is active?
A: Use the command sudo wg show to display the current status and statistics of your WireGuard interfaces. - Q: Is WireGuard suitable for production environments?
A: Absolutely. WireGuard’s simplicity, speed, and strong security make it ideal for both personal and enterprise VPN deployments.


