One of the latest technologies that has changed the approach to building infrastructure is virtualization. It is this technology that made it possible to divide a single physical space into several logical ones.

It is achieved mainly due to the OS kernel functions, which allow creating separate network, file, user spaces - namespaces. And also with the help of multithreading technology, where the processor uses special instructions that allow processing different machine code independently of each other.
In this article we will consider how you can enable such processing functions on your device.
Hardware virtualization via BIOS
Before you install one of the first/second type hypervisor, you need to make sure that virtualization is enabled in your processor configuration. To do this, open the Manager, click on the Performance tab and select CPU:

At the bottom the Virtualization parameter should be Enabled, if it is not then reboot your device. And the moment it starts, press many times the keyboard shortcut that suits your device/motherboard brand:
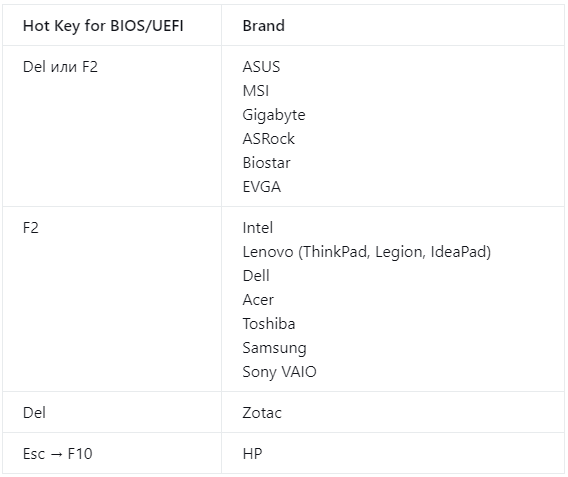
After that, go to the BIOS advanced settings mode using the interface or the F7 key and select the item corresponding to your device/motherboard brand:
- ASUS (UEFI BIOS) Advanced → CPU Configuration → Intel Virtualization Technology = Enabled
- MSI (Click BIOS 5) Overclocking → CPU Features → SVM Mode (AMD) or Intel VT-D (Intel) = Enabled
- Gigabyte (UEFI BIOS) Advanced CPU Core Settings → SVM Mode (AMD) / VT-d (Intel) = Enabled
- ASRock Advanced → CPU Configuration → Intel VT-x or SVM Mode = Enabled
- Dell / Lenovo / HP (laptops) Security → Virtualization = Enabled
After that don't forget to press F10 to save and exit BIOS, after rebooting open the dispatcher in the same tab or type the command in the terminal Win+X→Terminal:
systeminfo | find ‘Virtualization Enabled In Firmware: Yes’ 
Once we have verified that virtualization is enabled - we can install hypervisor on the devices!
Enabling the default Hyper-V hypervisor
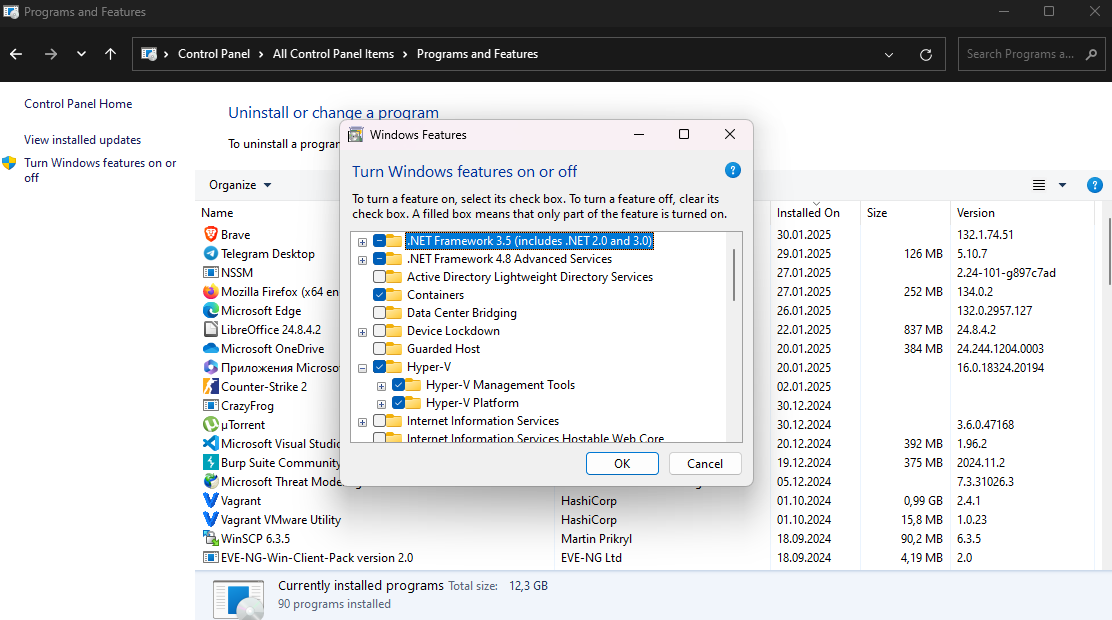
Next, let's enable it. To do this, go to the search and write Control Panel . On the left side select ‘Turn Windows features on or off’ and enable Hyper-V:
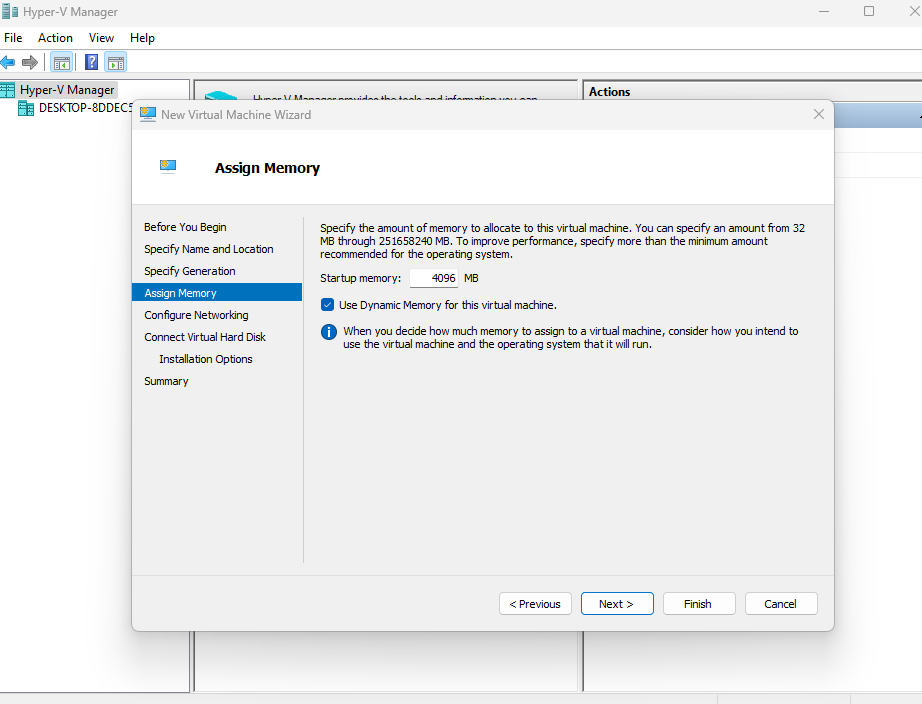
You may need to reboot the device afterwards, but then you can use the Hyper-V Manager client. You can also find it via search and create a new virtual machine:
In this tutorial, we have looked at how we can enable hardware virtualization on the device, as well as initialising the hypervisor!
Conclusion
Enabling hardware virtualization is a crucial step for running virtual machines efficiently on your device. By activating Intel VT-x or AMD SVM in your BIOS/UEFI, you unlock the processor’s ability to manage multiple virtual environments independently, improving performance and flexibility. After verifying the feature in the system and enabling a hypervisor like Hyper-V, your system is ready to host virtual machines for testing, development, or production workloads. Properly configuring virtualization ensures you get the most out of modern multi-core processors and virtualization software.
FAQ
- Q1: What is hardware virtualization?
A1: Hardware virtualization is a technology that allows a single physical CPU to create multiple isolated virtual environments (VMs), enabling independent execution of different operating systems and applications on the same device. - Q2: How do I check if virtualization is enabled on my system?
A2: On Windows, open Task Manager → Performance → CPU tab. The "Virtualization" field should show "Enabled." You can also run the command:systeminfo | find "Virtualization Enabled In Firmware" - Q3: What is the difference between Intel VT-x and AMD SVM?
A3: Intel VT-x and AMD SVM are processor-specific virtualization technologies. VT-x is used on Intel CPUs, while SVM (Secure Virtual Machine) is used on AMD CPUs. Both provide hardware support for running virtual machines efficiently. - Q4: How do I enable virtualization on different motherboards?
A4: Access BIOS/UEFI during startup and navigate to the CPU or Security settings:
ASUS: Advanced → CPU Configuration → Intel Virtualization Technology = Enabled
MSI: Overclocking → CPU Features → SVM Mode (AMD) / VT-d (Intel) = Enabled
Gigabyte: Advanced CPU Core Settings → SVM Mode (AMD) / VT-d (Intel) = Enabled
ASRock: Advanced → CPU Configuration → Intel VT-x / SVM Mode = Enabled
Dell/HP/Lenovo: Security → Virtualization = Enabled - Q5: Do I need to enable a hypervisor after enabling virtualization in BIOS?
A5: Yes. After enabling virtualization, install and activate a hypervisor like Hyper-V on Windows to create and manage virtual machines. This ensures that your system can utilize the virtualization features effectively. - Q6: Can I run multiple virtual machines at the same time?
A6: Yes, hardware virtualization allows multiple VMs to run simultaneously, depending on your CPU cores, RAM, and system resources. - Q7: My virtualization option is greyed out in BIOS. What should I do?
A7: This may happen if the CPU does not support virtualization or if it is locked by the manufacturer. Ensure your CPU supports VT-x or SVM, update your BIOS/UEFI, and check for any firmware locks.


