Among many infrastructure services that form a unified corporate system there is Proxy. Its main purpose is to become an intermediate node in traffic transmission and to fulfil the pre-established functionality of modifying/sniffing connections.

There are two types of such solutions forward and reverse-proxy, where the first redirects traffic to the outside through a single point, and the second vice versa from the external segment to the internal. In this article we will consider the second variant of its implementation and configure the service to work.
What is Reverse Proxy?
As we mentioned earlier, Reverse Proxy is an intermediate node through which external traffic passes to the servers, respectively from clients.
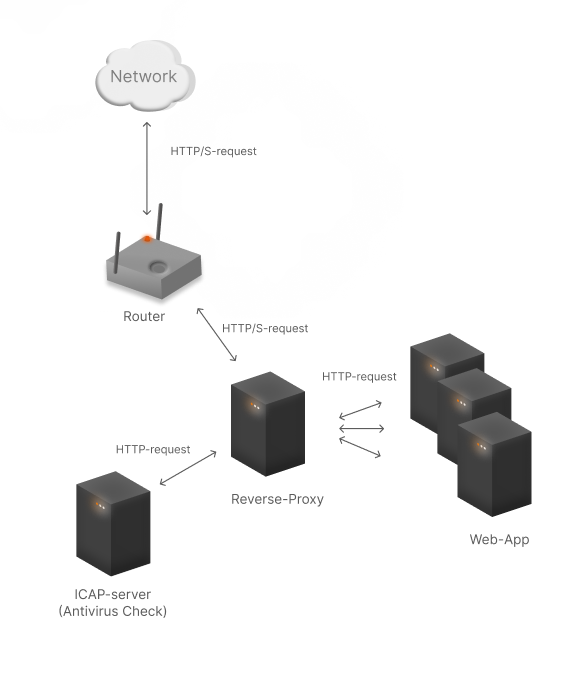
In such cases, this solution is due to the need to balance the load on the nodes, as the processing of the packets themselves can be quite load, then different approaches to balancing them can reduce it. It can also be a node for controlling the passing traffic, for example, a local WAF or a redirection node to ICAP servers.
If you don't have sufficient resources than you can perform actions on powerful cloud servers. Serverspace provides isolated VPS / VDS servers for common and virtualize usage.
Deployment and configuration
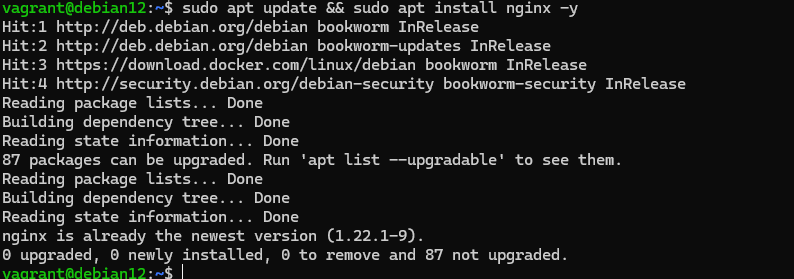
First of all, let's choose a software package that performs such proxying functions, usually simple web servers have this functionality, so let's use the Nginx package:
After we move on to the configuration of our service by the standard directory /etc/nginx, inside we are interested in two files that are responsible for the global configuration of the service and virtual hosts, let's go to the second one:
cd /etc/nginx/sites-available && nano 000-default.confIf your virtual hosts file is named differently, then go into that particular one with nano. Let's look at the basic syntax for a virtual host, which is determined by the SNI field in the incoming network packet:
 server {

listen ip:port;

server_name domain_name;

root /path/to/site-file;

index /index.html;

..

location / {}

..

}
Fill in the basic fields with your web server metadata, what port your web will be available on, what domain name will be handled, etc. Note that the location field will be responsible for acting on the packet that arrived at the specified path. Now this is a normal web server, to make it a reverse-proxy you need to add directives to location:
 location /date {

proxy_pass http://192.168.1.10:80;

proxy_set_header Host $host;

proxy_set_header X-Real-IP $remote_addr;

proxy_set_header X-Forwarded-For $proxy_add_x_forwarded_for;

proxy_set_header X-Forwarded-Proto $scheme;

} 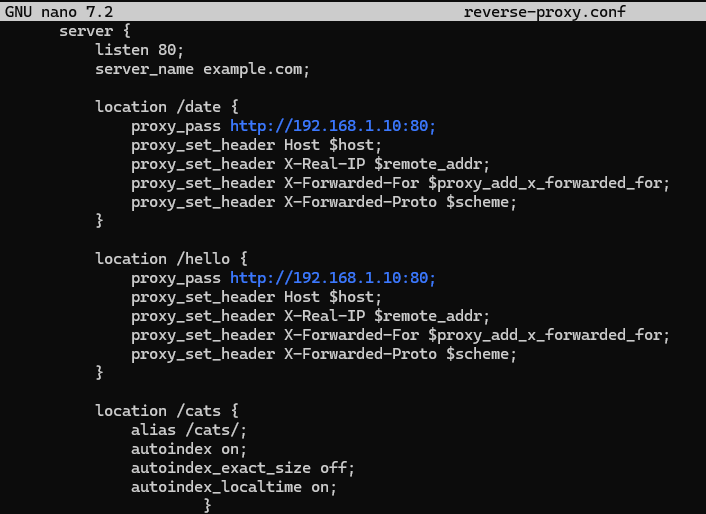
To understand the difference between reverse-proxy and web server compare the directives of the two paths /hello and /cats, in the latter case we specify the path where our data resides and in the former we proxy the connection. Note that the proxy_pass directive allows us to establish a connection to a resource and, as a client, transmit packets by modifying them with the proxy_set_header directive.
Each of them also has its own functionality:
- HOST will specify the hosts to be reached;
- X-Real-IP will specify the real address of the client before proxying;
- X-Forwarded-For will specify to whom it proxies;
- X-Forwarded-Proto will specify which scheme/protocol to use.
The modified packets will then be sent to the Upstream or Backend, where they will be further processed by the web application. Let's save the file and create a link to the config to autoload it:
ln -s /etc/nginx/sites-available/000-default.conf /etc/nginx/sites-enabled/000-default.confOr replace the file name with your own and create a link to the enabled part as well. After that restart nginx or make it re-read the config:
sudo systemctl restart nginx && sudo systemctl status nginx Since the nginx server listens on all interfaces by default, traffic coming to the device will be proxied and sent to the back. If there is a need to pre-terminate SSL traffic, add directives for its processing:
 ssl_certificate www.example.com.crt;

ssl_certificate_key www.example.com.key;

ssl_protocols TLSv1 TLSv1.1 TLSv1.2;

ssl_ciphers HIGH:!aNULL:!MD5;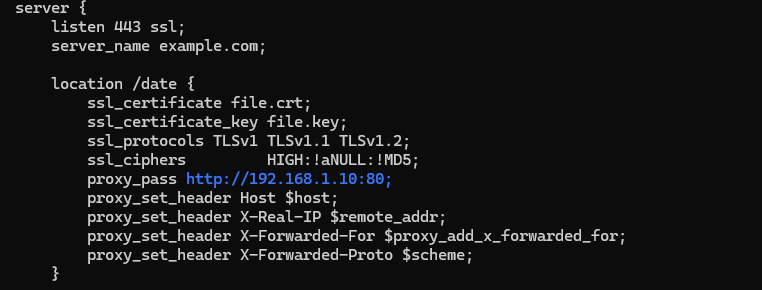
After that the traffic will be transmitted in the open, where further solutions will be able to process the incoming packets. Also in our knowledge base you can find materials on how you can configure WAF based on such Reverse Proxy solution!
Conclusion
Setting up a Reverse Proxy server is an essential step for modern web infrastructure. By acting as an intermediary between external clients and internal servers, a reverse proxy improves load balancing, enhances security, and enables SSL termination. Using Nginx as an example, we configured a reverse proxy that forwards requests, preserves client headers, and supports SSL traffic. With this setup, your internal servers remain protected while handling external requests efficiently. Reverse proxies also open opportunities for integrating additional security layers, such as WAFs, caching, or traffic monitoring.
FAQ
- Q1: What is the main purpose of a Reverse Proxy?
A Reverse Proxy serves as an intermediary between clients and internal servers. It distributes incoming traffic, improves load balancing, enhances security, and can handle SSL termination and caching. - Q2: Which software can be used as a Reverse Proxy?
Common solutions include Nginx, Apache, HAProxy, and Traefik. Each offers unique features, with Nginx being popular for web server integration and performance. - Q3: How does SSL termination work on a Reverse Proxy?
SSL termination allows the proxy to decrypt incoming HTTPS traffic, forwarding it as plain HTTP to internal servers. This reduces processing load on backend servers and centralizes certificate management. - Q4: What headers should be preserved when proxying requests?
Important headers include Host, X-Real-IP, X-Forwarded-For, and X-Forwarded-Proto. These headers maintain the original client information and protocol details. - Q5: Can a Reverse Proxy improve security?
Yes. By exposing only the proxy server to the internet, internal servers remain hidden. Reverse proxies also allow integration with firewalls, WAFs, and traffic monitoring tools. - Q6: How do I test if my Reverse Proxy is working correctly?
After configuration, restart your proxy service and access the proxied URL. Use tools like curl, browser developer tools, or monitoring services to verify that traffic is correctly forwarded and headers are preserved. - Q7: Is a Reverse Proxy suitable for high-traffic websites?
Absolutely. Reverse proxies distribute incoming requests across multiple backend servers, enhancing performance and reliability for high-traffic applications.


