Zabbix can monitor all kinds of systems so let’s see how to look after our windows servers. To do so we will download an agent program and configure it to send data to our server.
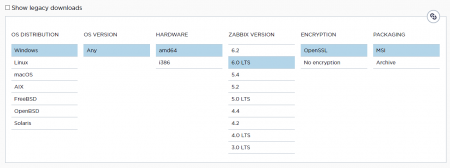
To install it we’ll need to get the template configuration file and installer at Zabbix official site.
https://www.zabbix.com/download_agents
Choose the file compatible with your configuration and Zabbix version and download it. (6.0 LTS in this example’s case).
There are two ways to install the agent, via MSI installer or manually by extracting it from the archive. Let’s see into both
MSI installation
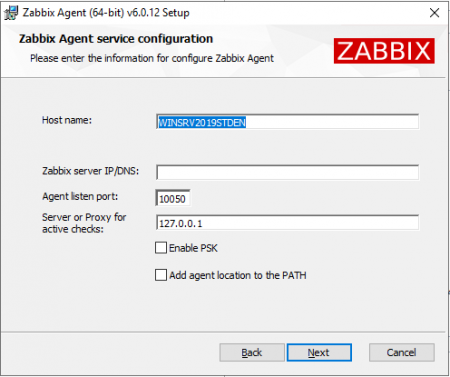
Proceed to installation, and enter your hostname and Zabbix server address, enabling PSK (Pre-Shared Key) won’t allow monitoring this server’s data until the agent gets a pre-shared key from the server trying to do so, we will see into this in other articles. Hit next until installation is complete.
And finally, let’s check if our Zabbix server sees this host
Everything is alright.
Archive Installation
РThis way may be useful if you want to make it automatic in any way or have other preferences.
After you download the archive file, extract all of its contents into a folder you want your agent installed in.
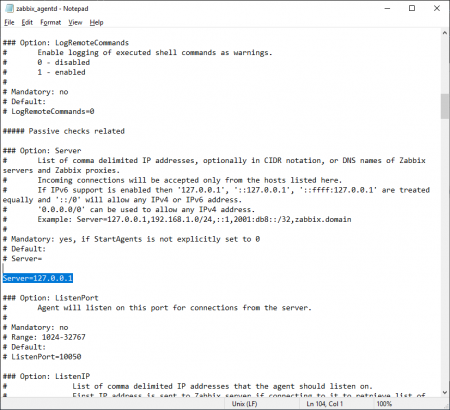
By default, the agent wants its config file in C:\ folder, so take zabbix_agentd.conf file from the \bin folder and put it there.
Let’s edit it a little: We want to change the Server option to our Zabbixix server’s IP.
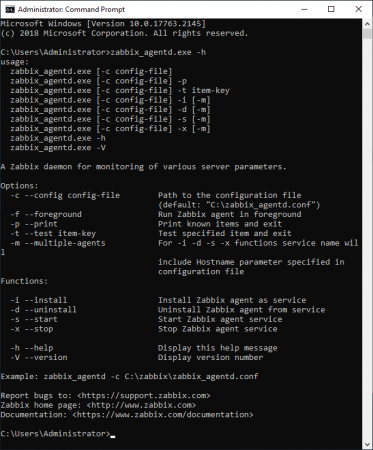
Next, run command prompt as an administrator and run
Now add -i key to install the service, also you can change the location where it will look for .conf file with -c.
After that run zabbix_agentd.exe -s to start the service
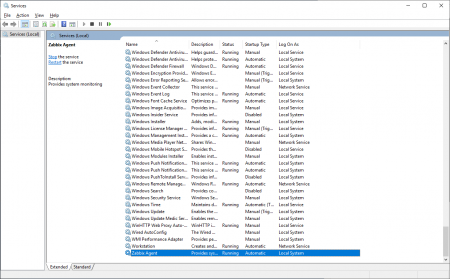
Start → services check if agent service is running and the startup type is automatic.
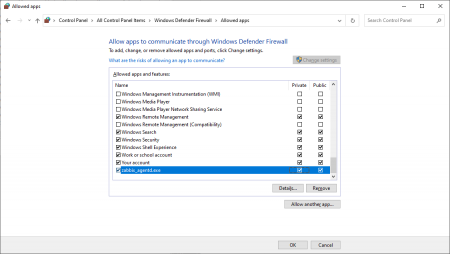
And now go to control panel→ windows defender firewall, allow another app, and add agent into allowed apps.
Troubleshooting (High-ROI)
If the Zabbix Agent is installed but the host still shows Unavailable or you don’t see metrics in Latest data, start with these checks — they cover most common failures.
1) Hostname mismatch (most common)
Symptom: The host exists in Zabbix, but data never appears (or agent checks fail).
Fix: In zabbix_agentd.conf, the value of Hostname= must exactly match the host name created in Zabbix (case, spaces, symbols). If you prefer not to hardcode it, you can use HostnameItem=system.hostname.
2) Wrong Server / ServerActive settings
Symptom: The agent service runs, but Zabbix can’t collect data.
Fix: Set Server= to the IP/DNS of the Zabbix server or proxy that is allowed to connect for passive checks. Set ServerActive= to the Zabbix server or proxy used for active checks (agent initiates connection). If you use a proxy, specify the proxy address — not the main server.
3) Firewall or network blocks TCP 10050
Symptom: Zabbix shows “cannot connect”, “timeout”, or “connection refused”.
Fix: Allow inbound TCP 10050 in Windows Defender Firewall (and any upstream firewall) for passive checks. In strict NAT/segmented networks, consider active checks via ServerActive to avoid inbound access requirements.
4) Service installed but not running (or wrong config path)
Symptom: The agent doesn’t respond; the service stops after start; the host stays unavailable.
Fix: Open Services and verify Zabbix Agent is Running and Startup type is Automatic. For ZIP/manual installs, confirm the service was installed with the correct config path via -c and that the configuration file exists at that location.
5) TLS / PSK misconfiguration
Symptom: The agent is running, but the connection fails immediately (handshake/auth errors).
Fix: TLS PSK is not automatic — the PSK identity and key must match on both sides (agent config + host settings on Zabbix server/proxy). If you’re not ready for TLS, disable it temporarily to validate basic connectivity first.
6) Wrong agent package or architecture
Symptom: Installation fails, the service won’t start, or the binary won’t run.
Fix: Download the correct agent build for your Windows version and CPU architecture (x64 vs x86) and match the Zabbix major version (for example, 6.0 LTS if your server is 6.0).
7) Host is not configured in Zabbix (no template linked)
Symptom: The agent is healthy locally, but Zabbix shows no items or metrics.
Fix: In Zabbix, create the host, add an Agent interface, and link a Windows template (for example, Windows by Zabbix agent). Without a linked template, you may not see metrics in Latest data.
Quick checklist (60 seconds)
- Hostname= matches the host name in Zabbix
- Server= / ServerActive= points to the correct server or proxy
- The Zabbix Agent service is running and set to auto-start
- Firewall allows TCP 10050 (or you use active checks)
- TLS/PSK settings match on both sides
- A Windows template is linked; check Latest data
Summary
In this guide, we covered two practical ways to install the Zabbix Agent on Windows: using the MSI installer for the fastest setup, and using the ZIP archive for more control and automation scenarios. After installation, make sure the agent configuration matches your host settings in Zabbix (especially Hostname, Server/ServerActive, and TLS options if used), confirm the Windows service is running, and allow traffic through the firewall (typically TCP 10050). Once the host is added in Zabbix and a Windows template is linked, you should start seeing metrics in Latest data.
FAQ
- Q: Should I install the agent with MSI or use the ZIP archive method?
A: MSI is best for quick, standard deployments with a simple wizard. The ZIP/archive method is better if you need automation (scripts), custom install paths, or want full control over configuration and service installation. - Q: What port does the Zabbix Agent use on Windows?
A: By default, Zabbix Agent listens on TCP 10050. Make sure this port is allowed in Windows Defender Firewall if your Zabbix server/proxy needs to reach the agent. - Q: Why doesn’t the host show up as available in Zabbix after installation?
A: The most common causes are: the Windows firewall blocks port 10050, the agent points to the wrong Server/ServerActive, or the Hostname in the agent config doesn’t match the host name created in Zabbix. - Q: What’s the difference between Server and ServerActive in the config?
A: Server is used for passive checks (Zabbix server/proxy connects to the agent). ServerActive is used for active checks (the agent connects to Zabbix server/proxy). Many setups use both, but active checks are often easier through firewalls/NAT. - Q: If I enable TLS PSK, will it work automatically?
A: No — PSK must be configured on both sides. You need the same PSK identity and key on the agent and in Zabbix (server/proxy/host settings), otherwise the connection will fail. - Q: Where can I find the Zabbix Agent logs on Windows?
A: It depends on your configuration (LogFile in zabbix_agentd.conf). If logging is enabled, check the path specified there and look for startup and connection errors (including TLS or network issues).

