Cloud storages are created not only for big companies, but for also for a regular people. Main goals - reserve copies of really important information and sharing files. Let's look how to install and set one of the cloud storages - ownCloud. We are going to install it on Ubuntu 16.04.
This guide explains how to install and configure ownCloud on an Ubuntu 16.04 server. You will learn how to deploy ownCloud using the LAMP stack, configure Apache, and connect to the storage using WebDAV.

Preparing the Server for ownCloud Installation
Note: Ubuntu 16.04 has reached end-of-life (EOL). This guide is intended for legacy systems. For new deployments, consider using a supported Ubuntu version.
LAMP should be installed on machine.
In the Serverspace you can create a server with already installed "LAMP".
If you don't, let's install it:
sudo apt-get install tasksel

sudo tasksel install lamp-server
OwnCloud installation
Let's install topical realise from official web via Wget. Let's install trusted certificate:
wget -nv https://download.owncloud.org/download/repositories/production/Ubuntu_16.04/Release.key -O Release.key

sudo apt-key add - < Release.key
Nextly, we are going to write in the list of the updated Ubuntu software ownCloud web and install it:
sudo echo 'deb http://download.owncloud.org/download/repositories/production/Ubuntu_16.04/' > /etc/apt/sources.list.d/owncloud.listsudo apt-get update
sudo apt-get install owncloud-files
Next we have to tune the configuration.
Configuration
Edit the owncloud.conf sample using any of the text editors. Add these code to the file:
Alias /owncloud "/var/www/owncloud/"

<Directory /var/www/owncloud/>

Options +FollowSymlinks

AllowOverride All

<IfModule mod_dav.c>

Dav off

</IfModule>

SetEnv HOME /var/www/owncloud

SetEnv HTTP_HOME /var/www/owncloud

</Directory>
Make a link via ln:
ln -s /etc/apache2/sites-available/owncloud.conf /etc/apache2/sites-enabled/owncloud.conf
Edit the access rights to the ownCloud directory adding -R level.
Let's reboot Apache.
How to connect to the storage
Open browser. In the searching web write IP of your virtual server, where your cloud storage was installed and add «/owncloud» in the end.

Screen №1. Administrator logging.
Attention! It is neccesery to add a path for Data folder
After a succsesefull logging, switch to the Admin profile and add new clients if it is necessary. You can do that in the "Users" menu.
You have to use WebDAV adain if you want to connect to your cloud. Let's talk about the emergence of the CyberDuck program, which can be downloaded from the official website: https://cyberduck.io/download/.
Install the app and go to the "Settings" menu. Chose new connection and add these parameters:
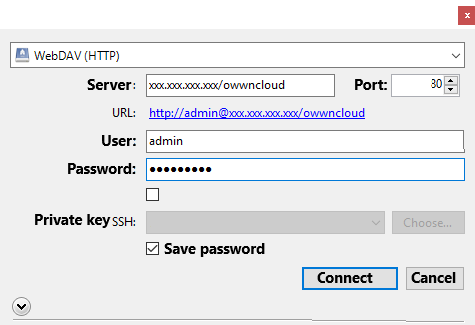
Screen №2. Creating a connection
Type an IP of your server with "/owncloud', username and password.
That's all. You are going to use your storage with CyberDuck.
Conclusion
ownCloud is a flexible and secure private cloud storage solution suitable for both organizations and individual users. This guide demonstrated how to install and configure ownCloud on Ubuntu 16.04 using the LAMP stack, configure Apache, and connect using WebDAV.
With ownCloud deployed, you gain full control over file storage, sharing, and data privacy.
FAQ
- Q1: What are the system requirements for installing ownCloud on Ubuntu?
A1: A server running Ubuntu 16.04 (or later) with a LAMP stack (Linux, Apache, MySQL, PHP) installed and configured. - Q2: Can ownCloud be accessed from mobile devices or other operating systems?
A2: Yes, ownCloud supports clients on Windows, macOS, Linux, Android, and iOS, allowing you to sync and access files across devices. - Q3: How secure is ownCloud for storing sensitive data?
A3: ownCloud supports SSL/TLS encryption, user authentication, and fine-grained access control to ensure data security. It’s important to use trusted SSL certificates and strong passwords. - Q4: What is WebDAV and how does it relate to ownCloud?
A4: WebDAV is a protocol that enables file management over HTTP. ownCloud supports WebDAV, allowing clients like CyberDuck to connect and manage files seamlessly. - Q5: How do I add more users or manage permissions in ownCloud?
A5: After logging in as an administrator, you can add users and assign roles in the “Users” section of the ownCloud web interface.


