Introduction
A few mouse clicks and several minutes are enough to get Ubuntu server in Serverspace cloud.
After server installation:
- root account is only existing;
- standard port 22 is in use for SSH server;
- no firewall in the OS;
- time zone is UTC.
It is recommended to perform several actions to increase security:
- there is no need to use root account for regular tasks because of chances to damage OS when running wrong command (either typo or some configuration misunderstanding). Instead, new regular user should be created and granted administrative permissions. Also, many attackers are searching servers in internet for opened port 22 and try to brute root password – common recommendation is disabling connection for root in SSH config and connect with regular user;
- change SSH port from 22 to unused one – it will decrease amount of connection attempts from outside;
- install UFW (Uncomplicated FireWall) to restrict unwanted connections to your server;
- set proper time zone to get correct time of events when analyzing system logs.

Creating new user and granting permissions
Connect to the server with root account:
ssh root@server_ipRun this command to create new regular user:
useradd -m -s /bin/bash myuserIt will add user with name myuser to the system (option "-m" is used to create home directory).
Set a complex password:
passwd myuserCharacters entered will not be visible (security reason) and it must be entered twice to ensure new password is set correctly.
Using utility “sudo” is a way to provide administrative privileges for a regular user. Ubuntu has the user group named “sudo” by default and user from this group can run any command (typing sudo prior desired command). It is enough to add new user to this group:
usermod -aG sudo myuserDisconnect from the server and connect again with new user:
ssh myuser@server_ipCheck if sudo is available:
sudo less /etc/sudoersContent of the file /etc/sudoers should be shown on the screen. It means myuser has needed permissions. root user can be disabled – next paragraph shows modifying SSH server config file.
Making changes in SSH server config file
Edit file /etc/ssh/sshd_config in your preferable text editor, e.g. in nano:
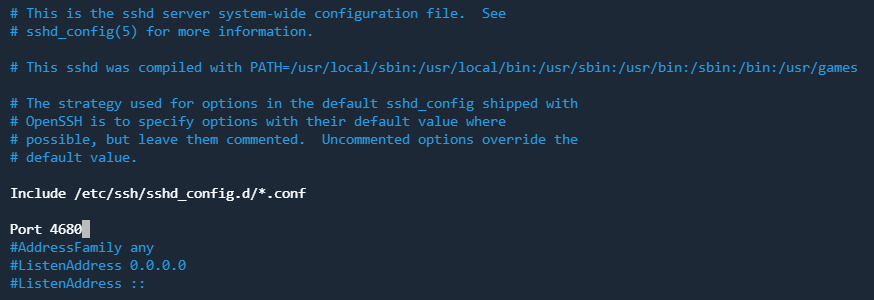
sudo nano /etc/ssh/sshd_configFind the commented string with port assignment "#Port 22":

Uncomment it and set another port number (the one which is not used in the system), e.g., 4680:
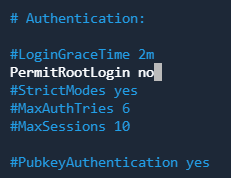
Next, in section "Authentication" find the string "PermitRootLogin prohibit-password" and replace it with "PermitRootLogin no":
Save the changes and close the file. Restart SSH server to apply changes:
systemctl restart sshd.serviceTry to login with root account and port 4680:
ssh root@server_ip -p 4680You will get error message because root is not allowed to connect anymore. Connect with myuser:
ssh myuser@server_ip -p 4680The connection should be allowed.
Installing UFW
New installed Ubuntu server has no firewall rules by default and connections from outside are not restricted. UFW is used to create the rules, installation is simple:
sudo apt update && sudo apt install ufwAfter installation UFW is not enabled:

Create new rule to allow port 4680 for SSH connections (replace with your port if differs):
sudo ufw allow 4680/tcp comment 'Allow SSH connections'Enable UFW:
sudo ufw enableCheck the status – it will show current status and created rule also:

Other services and ports can be added in the same way, e.g., to add port 443 for NGINX:
sudo ufw allow 443/tcp comment 'Allow HTTPS'There is additional our publication where is described how to use UFW – Common UFW commands
Setting time zone
Check current time settings:
timedatectl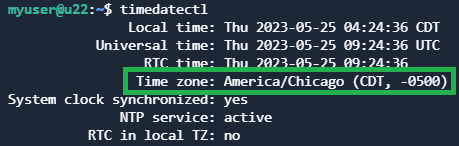
Currently it is UTC. Available time zones are shown with the command:
timedatectl list-timezonesChose desire one to set. For example, you need to set time zone for Chicago then run:
sudo timedatectl set-timezone "America/Chicago"Check current time zone once again:
Now events in system logs have proper time registration.
Conclusion
In this guide, you learned the essential steps to secure and configure your freshly installed Ubuntu server in the Serverspace cloud. Starting from creating a new non-root user with sudo privileges to disabling root SSH login, changing the default SSH port, installing and configuring the UFW firewall, and setting the correct time zone—each step is vital for improving your server’s security and manageability. Following these best practices reduces the risk of unauthorized access and prepares your server for stable and secure operation.
FAQ
- Q: Why should I avoid using the root account for regular tasks?
A: Using the root account increases the risk of accidental system damage due to typos or misconfigurations. Also, root access over SSH is a common target for brute force attacks. It’s safer to use a regular user with sudo privileges. - Q: How do I choose a new SSH port?
A: Select an unused port number above 1024 that is not assigned to other services on your server. This reduces automated attack attempts targeting the default port 22. - Q: What does UFW do, and why should I use it?
A: UFW (Uncomplicated Firewall) helps you manage firewall rules easily, allowing you to restrict incoming connections only to trusted ports and services, significantly improving server security. - Q: How can I verify my new user has sudo privileges?
A: After adding the user to the “sudo” group, log in as that user and run sudo less /etc/sudoers. If the file opens without errors, the user has the necessary permissions. - Q: Why is setting the correct time zone important?
A: Correct time zone settings ensure accurate timestamps in system logs, which is essential for troubleshooting, auditing, and security monitoring. - Q: Can I add more services to UFW later?
A: Yes, you can add or remove rules for any service or port using UFW commands, making firewall management flexible and straightforward.


