The modern digital landscape is marked by rapid growth in applications, services, and cloud solutions, driving the need for efficient resource utilization. With increasing computational demands and the necessity for optimization, there arose a demand for tools that enable:
- Deploying multiple applications on the same hardware.
- Managing resources (CPU, RAM, storage) with minimal overhead.
- Ensuring isolation and security of workloads.

The first step toward addressing these challenges was hypervisors, which allowed isolated virtual machines to run. However, with the rise of containerization, the need emerged for more flexible and lightweight solutions. This is why Kubernetes was created.
Definition
Kubernetes (K8s) is an open-source platform for orchestrating containerized applications. Its core functions include:
- Automating deployment, scaling, and management of applications.
- Optimizing cluster resource utilization.
- Ensuring fault tolerance and self-healing.
Originally developed by Google based on its internal Borg system, Kubernetes became a Cloud Native Computing Foundation (CNCF) project in 2014. Today, it is the standard for managing distributed systems in hybrid and multi-cloud environments.
Why Kubernetes Instead of Hypervisors?
Unlike hypervisors, which operate with virtual machines, Kubernetes works with containers—lightweight, fast-starting processes that share an OS kernel. This provides:
- Higher workload density.
- Minimal overhead.
- Portability of applications across environments.
Purpose
Kubernetes’ primary purpose is to automate the deployment, scaling, and management of containerized applications, including self-healing, load balancing, storage management, security, and hybrid environment support. It ensures fault tolerance, resource optimization, and unified application management across cloud or on-premises infrastructure.
Kubernetes addresses several critical challenges:
1. Eliminates container fragility by monitoring and restoring failed containers.
2. Automates manual scaling, enabling resource allocation without service downtime.
3. Reduces and automates network configuration complexity.
4. Improves resource efficiency, minimizing idle capacity.
Core Concepts
1. Deployment — Manages the lifecycle of Pods: handles application deployment, scaling, and updates.
2. Pod — The smallest unit in Kubernetes, running one or more containers with shared network/storage resources.
3. Service — An abstraction providing stable access to Pods via load balancing and DNS.
4. ConfigMap and Secret — Store configurations (ConfigMap) and sensitive data (Secret) for secure use in applications.
5. Volume — Provides persistent storage for Pods, surviving restarts.
6. Namespace — Logically partitions a cluster into isolated environments (e.g., dev/prod) for access control and resource management.
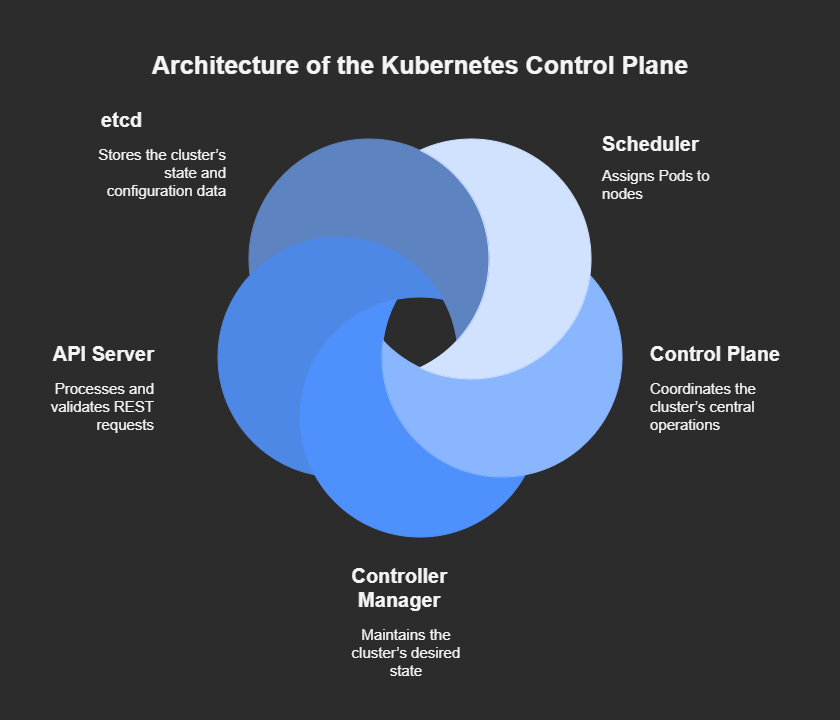
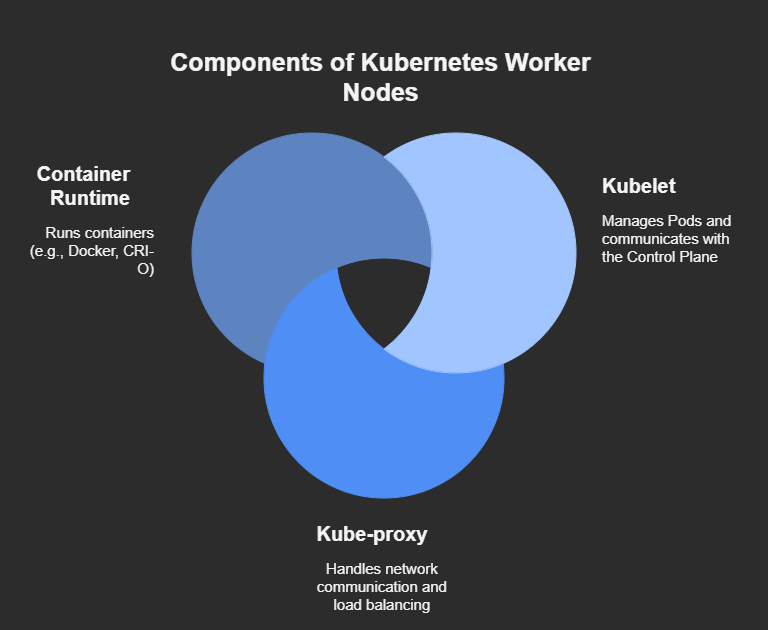
Architecture
Kubernetes architecture is divided into two parts:
1. Control Plane — Manages the cluster.
2.Worker Nodes — Execute workloads and tasks.
Deploying and Managing Kubernetes
Requirements for Kubernetes Deployment
To deploy a fully functional Kubernetes cluster, you need:
1. At least one control plane node (master) and multiple worker nodes.
2. Unique IP addresses for each node.
3. Minimum hardware requirements: 2 vCPU cores and 2 GB of RAM per node.
4. Network connectivity between all nodes.
Installing Kubernetes (k8s):
1. Update the System and Install Dependencies
To mitigate vulnerabilities and install packages (apt-transport-https, gnupg2) required for Kubernetes and CRI-O repositories:
apt-get install -yapt-transport-https gnupg22. Disable Swap Memory
- Prevents memory management conflicts in Kubernetes. Swap can trigger OOM Killer errors and reduce performance.
swapoff -a # Temporarily disable swap rm /swap.img # Remove swap file sed -i '/swap/d' /etc/fstab # Comment out swap in /etc/fstab3. Enable Kernel Modules br_netfilter and overlay
- br_netfilter enables network filtering for CNI plugins.
- overlay supports overlay filesystems (required for container storage).
modprobe br_netfilter overlayecho "br_netfilter" >> /etc/modulesecho "overlay" >> /etc/modules4. Configure IP Forwarding
Allows network traffic routing between Pods and nodes.
echo 1 > /proc/sys/net/ipv4/ip_forward5. Install kubelet, kubeadm, and kubectl
kubelet: Agent for running Pods on nodes.
kubeadm: Tool for initializing clusters.
kubectl: CLI for cluster management.
apt-get install -y kubelet kubeadm kubectl
apt-mark hold kubelet kubeadm kubectl # Block auto-updates
6. Install CRI-O (Container Runtime)
Lightweight runtime compatible with Kubernetes CRI.
echo "deb https://download.opensuse.org/.../ /" > /etc/apt/sources.list.d/cri-o.list
apt-get update
apt-get install -y cri-o cri-o-runc
systemctl enable crio && systemctl start crio
7. Initialize the Cluster with `kubeadm`
Deploys the Control Plane (API Server, etcd, Scheduler, Controller Manager).
kubeadm init --pod-network-cidr=10.100.0.0/16 # Assign Pod IP range8. Join a Worker Node
Expand the cluster to run applications. Use the token from kubeadm init output:
kubeadm join :6443 --token --discovery-token-ca-cert-hash 9. Configure kubectl Access
Manage the cluster from your local machine:
mkdir -p $HOME/.kube

sudo cp /etc/kubernetes/admin.conf $HOME/.kube/config
Managing Kubernetes
Core kubectl Commands
Resource Management
Viewing Status:
kubectl get pods # List Pods

kubectl get nodes # List nodes

kubectl get deployments # List Deployments

kubectl describe pod # Show Pod details Creating/Updating:
kubectl apply -f deployment.yaml # Deploy from a manifest
kubectl create deployment nginx --image=nginx:1.25 # Create a Deployment
Scaling:
kubectl scale deployment/nginx --replicas=5 # Increase replica count
Updates and Rollbacks:
kubectl set image deployment/nginx nginx=nginx:1.26 # Update the container image

kubectl rollout undo deployment/nginx # Roll back changesDeletion:
kubectl delete pod kubectl delete -f deployment.yaml # Delete resources defined in a manifest Debugging
Container Logs:
kubectl logs  # Logs of the main container

kubectl logs  -c  # Logs of a specific container
Accessing a Container:
kubectl exec -it -- sh Resource Monitoring:
kubectl top nodes # View CPU/RAM usage of nodes

kubectl top pods # View CPU/RAM usage of Pods
Managing Configurations and Secrets
ConfigMap
Used to store configurations (environment variables, files).
Example:
apiVersion: v1

kind: ConfigMap

metadata:

name: app-config

data:

app.env: |

LOG_LEVEL=INFO

DB_HOST=postgres
Secret
Used to store sensitive data (passwords, TLS certificates).
- Example:
apiVersion: v1

kind: Secret

metadata:

name: db-secret

type: Opaque

data:

password: dGVzdC1wYXNzd29yZA== # base64-encoded
Using in Pods
env:

- name: LOG_LEVEL

valueFrom:

configMapKeyRef:

name: app-config

key: LOG_LEVEL

- name: DB_PASSWORD

valueFrom:

secretKeyRef:

name: db-secret

key: password
Storage Management
Persistent Volumes (PV) and Persistent Volume Claims (PVC)
- PV: Physical storage resource (e.g., cloud disk).
- PVC: Request to allocate storage from a PV.
- Example PVC:
apiVersion: v1

kind: PersistentVolumeClaim

metadata:

name: data-pvc

spec:

accessModes:

- ReadWriteOnce

resources:

requests:

storage: 10Gi
Using in Pods
volumes:

- name: data-storage

persistentVolumeClaim:

claimName: data-pvc

containers:

- name: app

volumeMounts:

- mountPath: "/data"

name: data-storage
Security
RBAC (Role-Based Access Control)
Manages access rights for users and services.
- Example Role:
apiVersion: rbac.authorization.k8s.io/v1

kind: Role

metadata:

namespace: default

name: pod-reader

rules:

- apiGroups: [""]

resources: ["pods"]

verbs: ["get", "list", "watch"]
Network Policies
Restricts network traffic between Pods.
- Example: Block all inbound traffic
yaml

apiVersion: networking.k8s.io/v1

kind: NetworkPolicy

metadata:

name: deny-all-ingress

spec:

podSelector: {}

policyTypes:

- Ingress
Monitoring and Logging
Tools
Prometheus + Grafana: Collect metrics (CPU, RAM, network traffic).
EFK Stack (Elasticsearch, Fluentd, Kibana): Aggregate and analyze logs.
Kubernetes Dashboard: Web interface for cluster management.
Setting Up Monitoring
Install Prometheus via Helm
helm repo add prometheus-community https://prometheus-community.github.io/helm-charts

helm install prometheus prometheus-community/prometheus
Automation and CI/CD
GitOps with Argo CD
Automatically deploy applications from a Git repository.
Example:
argocd app create my-app --repo https://github.com/user/repo --path manifestsIntegration with Jenkins/GitLab CI
# .gitlab-ci.yml

deploy:

stage: deploy

script:

- kubectl apply -f k8s/
Troubleshooting
Check Cluster Events:
kubectl get events --sort-by=.metadata.creationTimestampCheck Node Status:
kubectl describe node # View node resources and issues Network Diagnostics:
kubectl run -it --rm debug --image=nicolaka/netshoot -- sh # Run a network debug containerFrequently Asked Questions (FAQ)
- Q1: What are the basic requirements to deploy Kubernetes on a server?
A: To deploy Kubernetes, you need at least one control plane node and one or more worker nodes, each with unique IP addresses. The minimum recommended hardware is 2 vCPUs and 2 GB RAM per node, along with stable network connectivity. - Q2: Why should I choose Kubernetes over traditional virtualization with hypervisors?
A: Kubernetes leverages containers instead of full virtual machines, which means faster startup times, higher workload density, minimal overhead, and easier portability across different environments. - Q3: Can Kubernetes run on both cloud and on-premises infrastructure?
A: Yes. Kubernetes is highly flexible and supports hybrid and multi-cloud deployments, as well as on-premises clusters, making it a unified platform for diverse infrastructure needs. - Q4: How do I ensure applications stay available if a container fails?
A: Kubernetes includes self-healing features. It automatically restarts failed containers, reschedules workloads to healthy nodes, and replaces unresponsive Pods, ensuring application uptime. - Q5: What tools can I use to monitor and visualize my Kubernetes cluster?
A: Commonly used tools include Prometheus + Grafana for metrics visualization, the EFK stack (Elasticsearch, Fluentd, Kibana) for log aggregation, and the Kubernetes Dashboard for a web-based management interface. - Q6: Is Kubernetes secure by default?
A: Kubernetes provides strong security features like Role-Based Access Control (RBAC), Secrets management, and Network Policies. However, securing a cluster requires proper configuration and continuous monitoring. - Q7: Do I need Docker to run Kubernetes?
A: No. While Kubernetes originally depended on Docker, it now supports various container runtimes like CRI-O and containerd, which are lightweight and fully compatible with Kubernetes.


