Network experts divide routers into two large classes - software and hardware. Hardware routers represent equipment developed in enterprises as a finished product. Software implementations are a set of programs or ready-made assemblies of operating systems that can be installed on almost any modern computer or server platform. Sometimes it is necessary to provide access from the Internet to machines located on the local network. Consider the configuration of routing - port forwarding using pfSense.

PfSense is a software distribution based on the FreeBSD OS and designed to organize a router or a firewall, or all at once. This OS can be installed on almost any computer or server. A key feature of pfSense is the solution of tasks through a web-based interface.
Network setting
If the configuration is performed via VPS/VDS, you should create all the required servers, one of which will be managed by pfSense. Add network adapters and merge them into a single virtual network.
Getting started with the setup
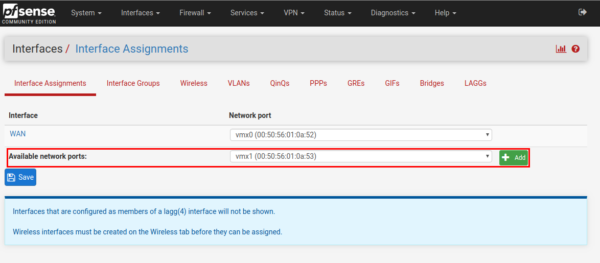
In the main menu of the program (horizontal black), select interfaces → Assignments.
The web page refreshes, a list of all network interfaces appears. “Free” interfaces are in the Available network ports field. All interfaces are shown with mac addresses on them. From the drop-down list, select the necessary one and click the “Add” button.
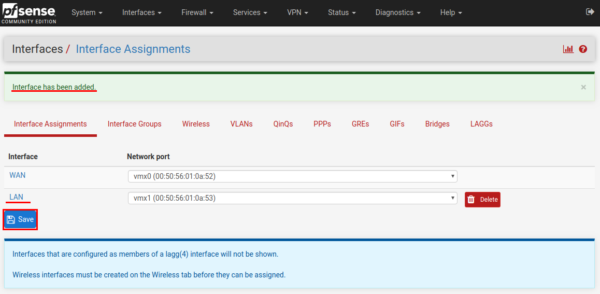
After completing the action, the system will notify you of the successful addition. The interface will be called “LAN”. Save the settings by clicking on the “Save” button.
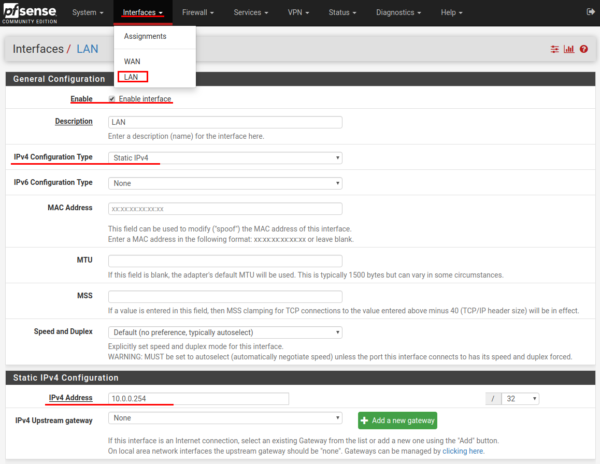
Configure the network adapter. To do this, open interfaces → LANin the main menu.
By setting the checkbox in the Enabled field, we activate the interface. Setting IPv4 as static IP (Static IPv4).
In the “Static IPv4 Configuration” configuration settings section, specify the IP address for this interface, in our case 10.0.0.254, maybe you will have a different one. At the very bottom of the page, click the “Save” button to save the changes.
The system will notify you of the changes. We apply them by clicking on the button “Apply changes”.

Configure the network interfaces of the clients
When configuring client network interfaces, it is important to remember that the address of the pfSense server must be specified as the gateway, in our case 10.0.0.254.
Configuring in Ubuntu
Editing the file /etc/network /interfaces:
auto ens31iface ens31 inet staticaddress 10.0.0.2netmask 255.255.255.0dns-nameserver 8.8.8.8gateway 10.0.0.254Restarting the network service:
/etc/init.d/networking restartWindows
To configure the network adapter in Windows, you must open start → Control Panel → Network and Internet → Network Connections or
Start → Control Panel → Network and Internet → Network and Sharing Center → Change adapter settings.
In the opened folder, right-click on the network adapter icon, select “Properties”.

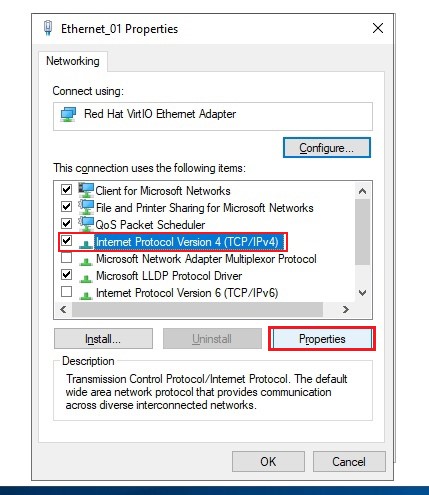
In the window that opens, click on the name (not on the checkbox) and select “Internet Protocol Version 4 (TCP/IPv4)”. Click the “Properties” button.
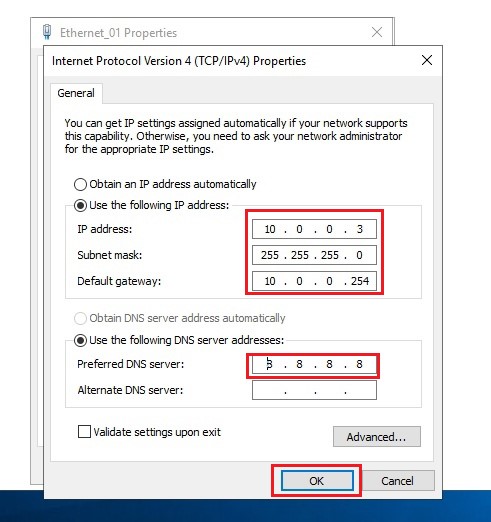
In a new window, specify:
- IP address - 10.0.0.3;
- Subnet mask: 255.255.255.0;
- Gateway - 10.0.0.254;
- Preferred DNS server: 8.8.8.8.
To save, click the “OK” button. In the Properties window of the network adapter, also click the “OK” button.
Important! Please note again that the pfSense server IP address must be specified as the default and default gateway.
Setting up routing
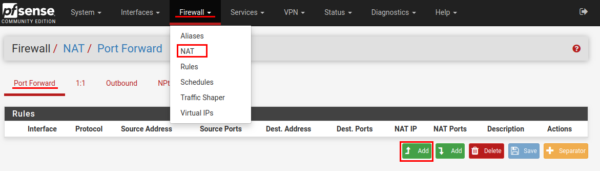
In the main menu of the web application, select firewall → NAT. On the “Port Forward“ tab click the button Add.
On the page that opens for editing the traffic redirection rule, we will create a rule for the RDP interface.
In the field Destination specify Any.
Destination port range (from a port) - select the destination port, in our case, MS RDP. The “to port” field will be filled in automatically.
Redirect target IP - specify the IP address of the server or computer running Windows.
Redirect target port - MS RDP.
If desired, fill out the description field - “Description”.
Click the button “Save”. And do not forget to click the “Apply changes” button.
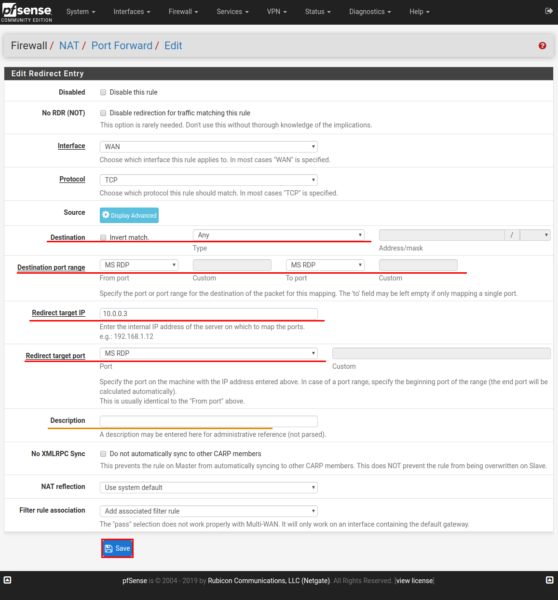
Important! If the RDP port was changed (by default 3389), select the port name “Other”, in the Custom field indicate the current value.
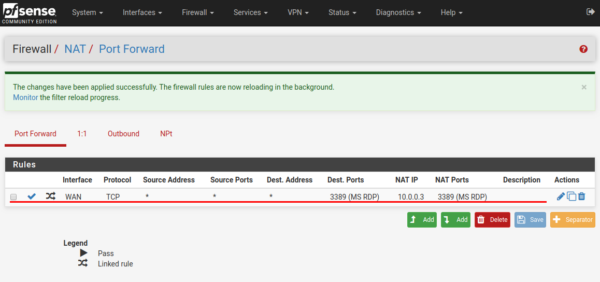
The created rule is displayed as in the example below.
Similarly, rules are created, say, for SSH access.
Checking the connection
To test the settings, you need to connect an SSH client or application to access the remote desktop to the external IP address of the pfSense server.
You can also perform the check using the network port sniffer —nmap.
Conclusion
pfSense provides a powerful and flexible software solution for routing and firewall functions on commodity hardware or virtual servers. Configuring port forwarding in pfSense allows secure and controlled access to internal network services such as RDP or SSH from the outside world. By properly setting network interfaces, client gateways, and NAT rules, administrators can efficiently manage network traffic without relying on dedicated hardware routers. This setup is especially useful in virtualized environments and VPS/VDS platforms. With pfSense’s intuitive web interface, managing complex routing policies becomes accessible even for those new to network administration.
FAQ
- Q: What is port forwarding in pfSense?
A: Port forwarding is a NAT (Network Address Translation) feature that allows external devices to access services on a private network by redirecting traffic from a public IP and port to a specific internal IP and port. - Q: Can pfSense be installed on any hardware?
A: pfSense is based on FreeBSD and can be installed on most standard PC hardware, servers, or virtual machines with compatible network interfaces. - Q: How do I set a static IP for the LAN interface in pfSense?
A: In the pfSense web interface, go to Interfaces → LAN, enable the interface, select IPv4 static, and enter the desired IP address and subnet mask, then save and apply changes. - Q: Why must client devices use the pfSense server IP as their gateway?
A: The pfSense server acts as the router for the network, so clients must use its IP as the default gateway to send traffic outside their subnet. - Q: What should I do if I changed the default RDP port?
A: When creating port forwarding rules, select “Other” for the destination port and manually enter the custom port number. - Q: How can I test if port forwarding is working correctly?
A: You can connect to the forwarded service using an external client (e.g., RDP or SSH client) or use network scanning tools like nmap to check if the port is open and responding.


