
What is Moodle ?
Moodle is a learning management system.
Essentially, it's an easy way for schools and teachers to give students marks, check their own work and keep track of their grades.
And it's all online. If you've ever worked with something like an online whiteboard or taken part in a course, then you know what we're talking about.
Moodle is distributed under the GNU GPL license and is completely free to use without user limits. It can be scaled to support thousands of users depending on server resources and system optimization.
Extensive communication is one of the strengths of moodle:
- The system supports the exchange of files in different formats.
- The newsletter service allows all course participants or individual groups to be informed promptly about current events.
- Course users can also communicate with one another by email, forum, chat, messaging, and webinar.
- A large selection of blocks (calendar, latest news, upcoming events etc. ) expand the functionality and usability of the system.
Additional function modules can be installed as needed. Moodle can be used for:
- Distance learning, where the teacher and learner do not meet in person most of the time;
- Distance support for face-to-face education, where the student can receive and submit assignments via moodle;
- Support for face-to-face education, allowing individual practical assignments, tests in moodle to be completed during face-to-face classes.
Preparing Ubuntu 20.04 for Moodle Installation
To run Moodle on Ubuntu 20.04, you need a web server, PHP, and a database server. In this guide, Apache is used as the web server.
this step will be skipped as we use an out-of-the-box solution when we set up the server. On our website we have instructions on how to install and configure apache.
Apache can be installed manually or preinstalled during server deployment, depending on your hosting provider.

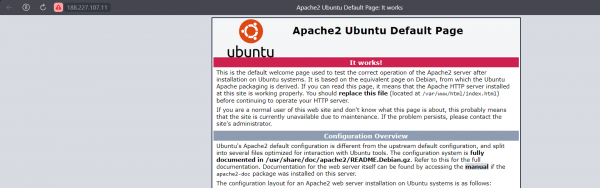
Because apache was installed during the creation of the server, we can access our ip address in the webstring and we will see this message that apache is up and running.
Update our machine using the commands below:
sudo apt update && sudo apt upgrade -y
It is required to install mysql client and server library, also don't forget php library to communicate with apache.
sudo apt install apache2 mysql-client mysql-server php7.4 libapache2-mod-phpAfter this, additional software will need to be installed.
This will take longer because you need to install the multi-layered compatibility of the php, mysql,
prerequisite libraries to make them work together.
sudo apt install graphviz aspell ghostscript clamav php7.4-pspell php7.4-curl php7.4-gd php7.4-intl php7.4-mysql php7.4-xml php7.4-xmlrpc php7.4-ldap php7.4-zip php7.4-soap php7.4-mbstring git -y
Do not forget to restart the apache web server:
sudo service apache2 restartTo check the status of the web server, type the command below:
sudo systemctl status apache2Go to the "opt" directory and clone what we need:
cd opt![]()
![]()
Cloning data to our server:
sudo git clone git://git.moodle.org/moodle.gitOnce installed, navigate to the folder where we will download the desired files.(When we're done, we will simply move the folder to the directory we want)
![]()
![]() :
:
cd moodleList available branches, if needed:
sudo git branch -a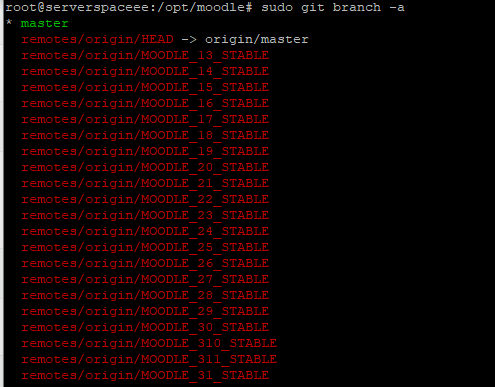
After that, select a particular branch and install it:
sudo git branch --track MOODLE_39_STABLE origin/MOODLE_39_STABLE
Check the installed version of Moodle on our server:
sudo git checkout MOODLE_39_STABLE
Copy the directory where we downloaded all the data (in our case /opt/moodle, to the apache directory.
Example command:
sudo cp -R /opt/moodle /var/www/html/![]()
![]()
Let's create a folder where the moodle data will be stored:
sudo mkdir /var/moodledataDo not forget to give it certain permissions:
sudo chown -R www-data /var/moodledata

sudo chmod -R 777 /var/moodledata

chmod ugoa=rwx /var/moodledata

sudo chmod -R 0755 /var/www/html/moodle
This folder will store lesson documents, not configuration files!
Preparing the MySQL Database for Moodle
The following configuration is only for those with MySQL version below 8.0, you can check the MySQL version with the command:
mysql --versionConfigure the MySQL configuration file
Fore configure config you could use any text editor as you like, in our case it will be "nano".
sudo nano /etc/mysql/mysql.conf.d/mysqld.cnf![]()
![]()
It's required to add 3 lines of code at the end of the configuration file,
see how it's implemented in our case:
default_storage_engine = innodb

innodb_file_per_table = 1

innodb_file_format = Barracuda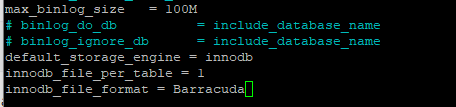
Save the configuration file and restart the database.
Creating a database
The command below we connects to mysql:
mysql -u root -p![]()
![]()
Turn on support for 4 byte UTF 8:
CREATE DATABASE moodle DEFAULT CHARACTER SET utf8mb4 COLLATE utf8mb4_unicode_ci;![]()
![]()
Create a user for the database:
create user serverspace@'localhost' IDENTIFIED BY 'P@ssw0rd';Grant full rights for our user:
GRANT SELECT,INSERT,UPDATE,DELETE,CREATE,CREATE TEMPORARY TABLES,DROP,INDEX,ALTER ON moodle.* TO serverspace @'localhost';
Exit MySQL:
quit
Grant access rights to the "moodle" folder:
sudo chmod -R 777 /var/www/html/moodle![]()
![]()
Restart your server:
systemctl restart apache2![]()
![]()
Completing the installation, setting up Moodle
After restarting, further configuration can be done from within the web interface:
If you have done everything correctly,
open your browser and type the ip address of your server into the web interface,
after it add the following "http://SERVER_IP/moodle/install.php".
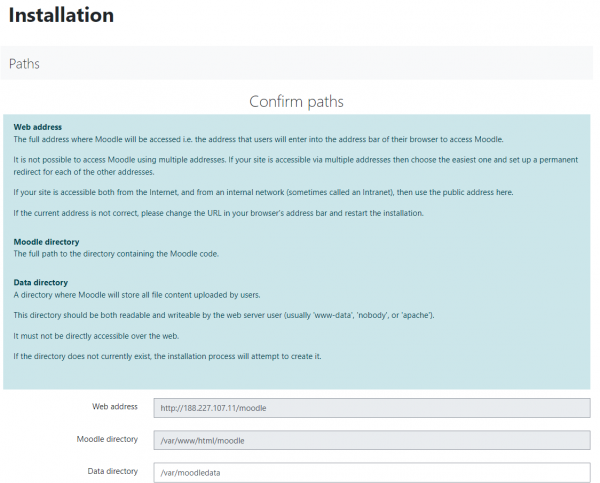
You should get a window like this:
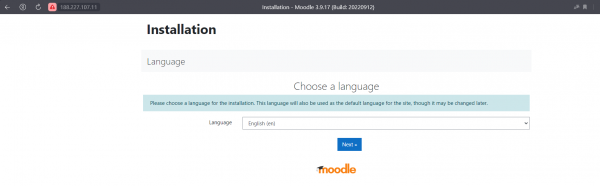
Then follow the instructions on the screen and set it up the way you want it!
Don't forget to change the path to your data folder:
In the following screenshot, specify the login and password for your created database.
Next you will need to wait for the installation to complete.
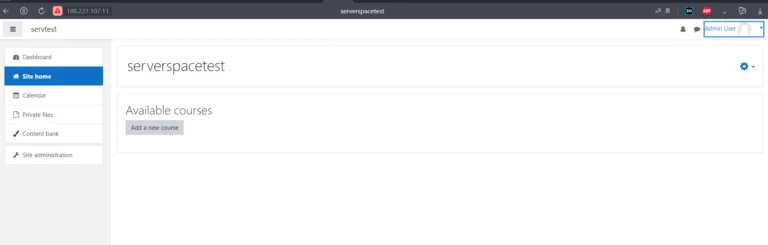
After the correct installation you will have the admin panel open.
Conclusion
This guide showed how to install and configure Moodle on an Ubuntu 20.04 server, including web server setup, PHP configuration, database preparation, and completing the installation via the web interface. Moodle is a flexible and scalable LMS suitable for educational and corporate learning platforms.


