What is Bitwarden?
Bitwarden stands as an advanced password management solution, enabling users to securely store and effectively manage their passwords. With its encrypted platform, it offers a reliable and protected means of storing login credentials, credit card details, secure notes, and other sensitive information. Bitwarden exhibits excellent compatibility, extending client support across diverse operating systems and devices, encompassing Windows, Linux, MacOS, web browsers, and mobile platforms. Notably, it empowers users to generate robust, one-of-a-kind passwords, effortlessly autofill login forms, and seamlessly synchronize data across multiple devices.
Emphasizing utmost security and privacy, Bitwarden leverages end-to-end encryption, ensuring exclusive access solely to the user. Furthermore, it encompasses supplementary features, including two-factor authentication and the ability to self-host the Bitwarden server, granting individuals complete control over their data. Bitwarden comes in both free and premium versions, with premium subscribers gaining access to enhanced features and additional options.
Why you need self hosted server with open-source password manager?
Modern password management services can be dangerous due to various security risks. Here are some reasons why:
- Data Breaches: Password managers store sensitive information, such as login credentials and personal data, in one centralized location. If the service experiences a data breach, cybercriminals can gain access to a large number of user passwords. For example, the LastPass password manager suffered a breach in 2015, compromising user data.
- Single Point of Failure: Relying on a single password manager creates a single point of failure. If the master password or authentication method is compromised, all stored passwords become vulnerable. This happened with the OneLogin password manager in 2017 when unauthorized access led to data exposure.
- Malicious Apps and Extensions: Some password managers offer browser extensions or mobile apps to autofill passwords. Malicious or compromised extensions can collect sensitive data or inject malicious code, compromising the entire password repository.
- Phishing and Social Engineering: Users may unknowingly reveal their master password or other sensitive information to attackers through phishing attacks or social engineering. Attackers can mimic legitimate password manager interfaces to trick users into providing their login credentials.
- Dependency on Cloud Services: Cloud-based password managers synchronize data across devices, making it convenient but also dependent on the service's security measures. If the service experiences downtime or an outage, users may be unable to access their passwords.
- Lack of End-to-End Encryption: Some password managers do not use end-to-end encryption, which means that passwords are decrypted on the server side, making them susceptible to unauthorized access.
- Keyloggers and Clipboard Sniffing: Password managers typically rely on copying and pasting passwords, leaving them vulnerable to keyloggers or clipboard-sniffing malware that can capture sensitive data.
- False Sense of Security: Users may become complacent and trust the password manager entirely, neglecting other security measures like using strong unique passwords or enabling two-factor authentication.
To mitigate these risks, users should choose reputable password managers with a strong security track record, use two-factor authentication where possible, and regularly monitor their accounts for any suspicious activities. Additionally, maintaining offline backups of critical passwords can provide an extra layer of security.

Preparing the system for installation
Prior to installing the password manager, it is essential to update the system packages to ensure optimal performance and compatibility:
sudo apt update && apt upgradeInstall the Apache and Curl packages.
sudo apt install apache2 curl -y
Before proceeding with the Docker setup, it is necessary to configure the dependencies. Once the dependencies are in place, you can proceed with setting up Docker.
sudo apt install apt-transport-https ca-certificates curl gnupg-agent software-properties-common -y
Include the GPG keys from Docker to enhance the security and integrity of the installation.
curl -fsSL https://download.docker.com/linux/debian/gpg | sudo apt-key add -Add docker repository to your system.
sudo add-apt-repository "deb [arch=amd64] https://download.docker.com/linux/debian bullseye stable && apt update"Installing Docker
sudo apt install docker-ce docker-ce-cli containerd.io docker-composeNext step will conclude in give permission to the user:
sudo usermod -aG docker *username*Installing Bitwarden
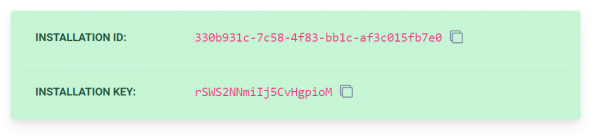
The next step includes obtaining a hosting ID and key to proceed with the installation. Visit the Bitwarden website, enter your administrative email, and obtain the necessary details.
Download main component of ready to use server:
curl -Lso bitwarden.sh https://go.btwrdn.co/bw-sh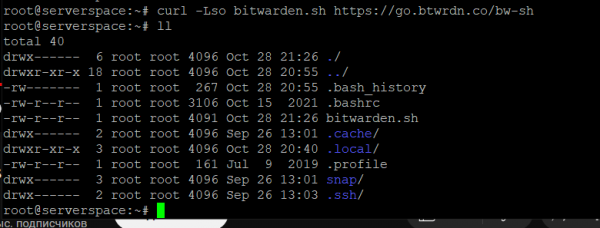
To set up BitWarden you need a normal script that you can open by running the command:
cat bitwarden.shBitWarden uses preinstalled configs, so after installing it you can check its functionality at once and after installing it you can configure it in the way you need:
The script needs to be made executable.
![]()
![]()
Use the command below to check the rights granted.

Install BitWarden using the installation script.
sudo ./bitwarden.sh install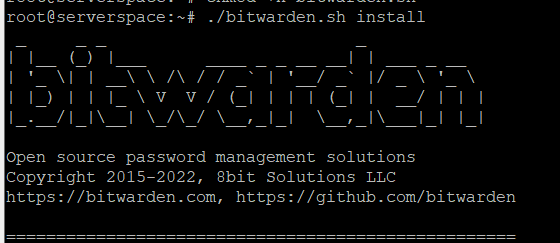
Enter the required data. To make your server visible from the internet, enter your domain in the corresponding field. Otherwise, fill the field with "domain.org" and press Enter. Additionally, remember to fill out another field.
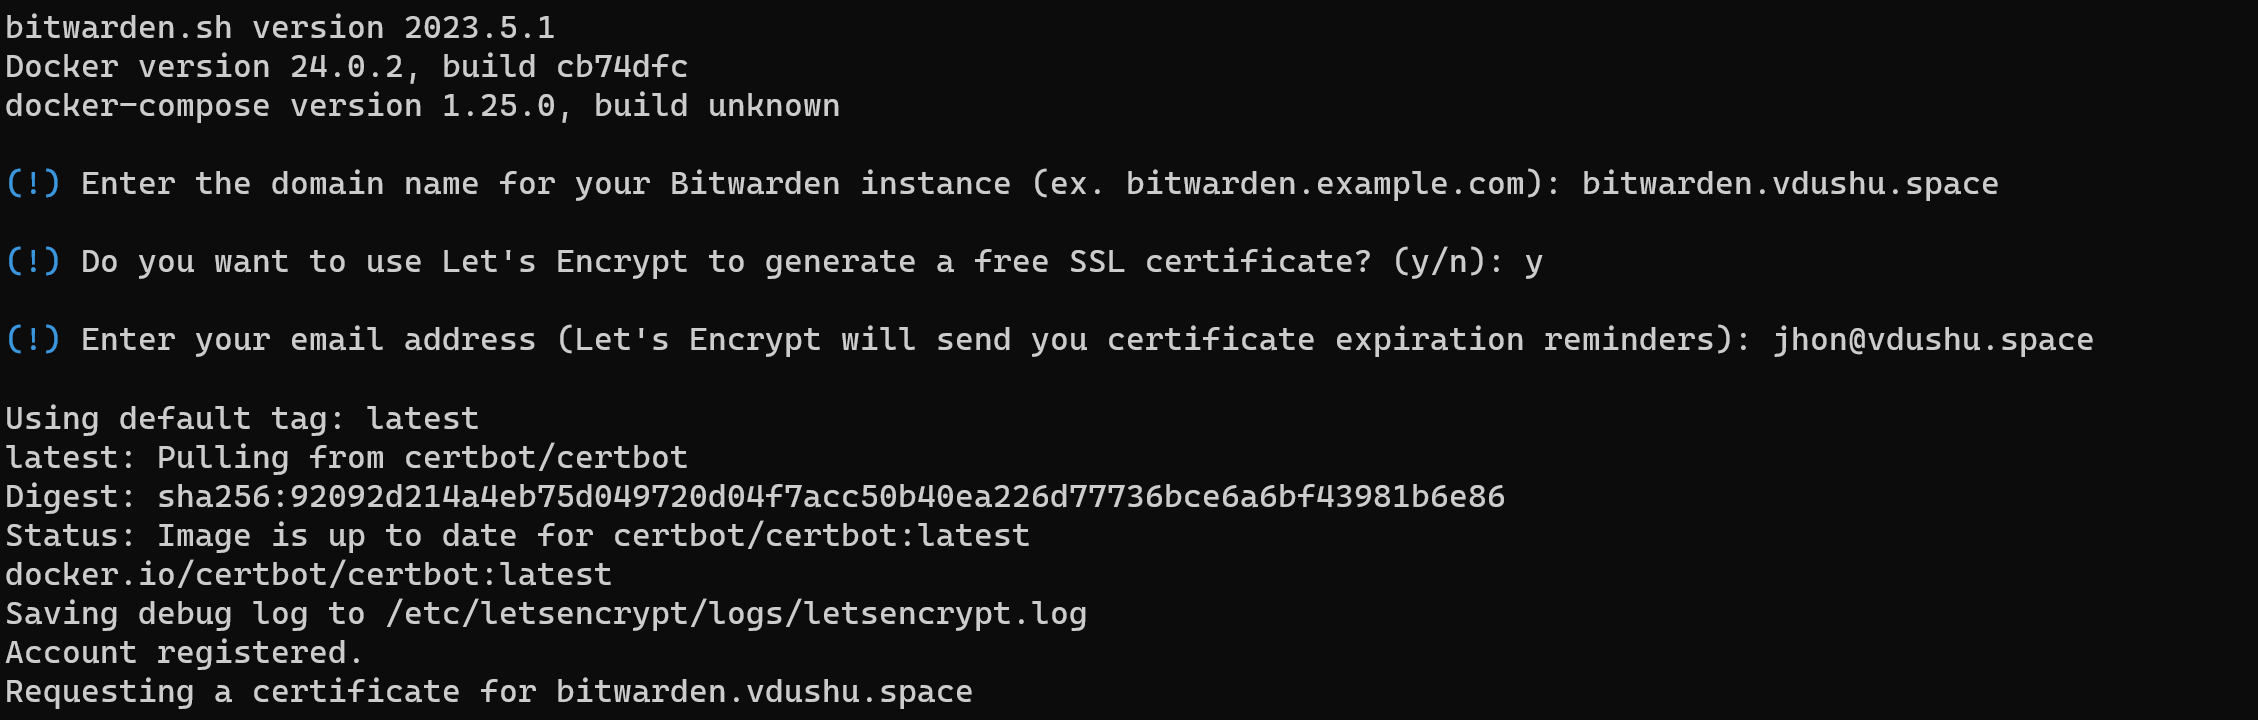
Great! The certificate has been obtained and now we can name the database:

Wait to install when all the containers are pulled up:

Once the installation is finished, proceed to enter the installation ID and key that you obtained earlier. Afterward, wait for the Diffie Hellman private key generation process to be completed.

The installation was successful.
Launching Bitwarden
Before we start, we need to configure the config. Let's configure it using any text editor.
nano ./bwdata/config.ymlTo ensure a smooth experience with the web interface, you have the option to edit the port to a preferred value. But, if you have a separate server dedicated to the manager and other web resources that won't conflict, you can select to leave the default values as they are. This will help avoid any potential issues.

nano ./bwdata/docker/docker-compose.ymlTo configure some Bitwarden functions that are not installed by the bitwarden.sh script, you can edit the environment file located at ~bwdata/env/global.override.env.
nano ~bwdata/env/global.override.envBy editing the environment file and updating these parameters, you can configure additional functions of Bradwarden according to your specific requirements, all parameters for filling are shown in the screenshot below. To fill in these items, you need raise the mail server. Do not forget to save the changes after editing the file using the keyboard shortcuts Ctrl+O and exit the text editor using Ctrl+X.

The password manager is started with a command.
sudo ./bitwarden.sh startDuring the initial startup, please be patient as Bitwarden takes some time to create all the necessary components for it to function properly.

After successful start-up, a message will be displayed indicating that the web interface is ready.
Required! If you are not using IPv6, make sure to comment out the relevant lines in the nginx configuration:
nano ~/bwdata/nginx/default.confComment out any lines that may be associated with IPv6, these are marked in blue in the screenshot:

To complete the initial setup of the DNS record, you will need to configure the A record at your domain registrar. In one field, specify your 3rd level domain, while in the other field, provide the IP address for the connection:

Navigate to the web interface using the server domain address.

When creating a user, it is essential to remember that the password associated with the account serves as the primary key to access all passwords. You have the option to leave a hint for the password to ensure it is not forgotten.

Send yourself a confirmation email to make your account work without restrictions! However, the limited functionality is also quite enough to work with. Create data objects in the main window:
 The box with the fields is the profile you need to fill in:

The entry made is as follows:

Recommendation for setup
When it comes to upgrading a self-hosted server and ensuring compliance with regulatory requirements, consider the following steps:
- Stay Informed: Keep up to date with the latest security patches, updates, and best practices for the software and operating system running on your self-hosted server. Regularly review release notes, security advisories, and community forums to stay informed about potential vulnerabilities and recommended upgrades.
- Backup Data: Before performing any upgrades, ensure you have a comprehensive backup strategy in place. Regularly backup all critical data and configurations to minimize the risk of data loss during the upgrade process.
- Test in a Development Environment: Create a development or staging environment that closely mirrors your production environment. Test the upgrades and updates in this environment first to identify any compatibility issues, conflicts, or unexpected behaviors that may arise.
- Plan for Downtime: Upgrades often require system downtime or service interruptions. Plan your upgrade schedule during a period of low activity or implement a failover mechanism to minimize the impact on users. Communicate the planned downtime to affected parties in advance.
- Follow Vendor Documentation: Follow the official documentation provided by the software vendor or project maintainers for upgrading the specific components running on your self-hosted server. Each software may have its own upgrade procedures, so ensure you understand and follow the recommended steps.
- Test and Verify: After completing the upgrade, thoroughly test all critical functionalities and verify that the system is functioning as expected. Perform regression testing to ensure no unintended consequences or regressions have occurred.
- Monitoring and Auditing: Implement monitoring tools to track the health and performance of your self-hosted server. Regularly review logs and conduct audits to identify any anomalies or security-related events. This helps you quickly address any issues and maintain compliance with regulatory requirements.
- Compliance with Regulatory Requirements: Understand the specific regulatory requirements that apply to your industry or jurisdiction. Identify the security controls, data protection measures, and documentation necessary to meet compliance standards. Implement appropriate security measures such as access controls, encryption, data retention policies, and user activity monitoring to ensure compliance.
- Regular Security Assessments: Conduct periodic security assessments, such as vulnerability scanning and penetration testing, to identify any security weaknesses or potential risks. Address any identified vulnerabilities promptly and document your efforts to maintain a robust security posture.
- Employee Training and Awareness: Provide training to employees on security best practices, regulatory requirements, and their roles and responsibilities in maintaining compliance. Promote a culture of security awareness to minimize human-related risks and encourage adherence to security protocols.
Remember that compliance requirements can vary based on your specific industry, region, and the nature of your data. It is essential to consult legal and compliance experts to ensure that your self-hosted server meets all applicable regulatory requirements.
Conclusion
With this comprehensive guide, you will easily install, configure, and launch Bitwarden on your server, providing a reliable and secure password management solution for both personal and organizational use. Whether you’re setting up Bitwarden for individual convenience or to support a team, this tutorial covers all the essential steps to get your password vault up and running efficiently, helping you protect your sensitive information across multiple devices and platforms.


