It is considered that public (open) networks are not securing at a needed level. There are potential risks of traffic capturing (interception) by malicious users in such networks —
in caffe, railway or bus station, shopping mall etc. Captured traffic could become as an information source for accounts hacking, confidential data stealing, other critical security issues.
VPN (virtual private network) is a method to organize private (personal) net that sending encrypted data over public ones.
Ordinary customers and organizations (no matter what form or size) are using VPN regularly.
Certain users are just permitted to access a private network (employing various types of authentications) with mandatory connections encryption, so in most cases makes senseless traffic interception for accessing valuable (useful) data.
In general, the functioning of a private network depends on particular implementation.
The client-server model is more often applies where communication among network nodes is provided by VPN server. A server can be represented as physical\virtual host running server OS (btw desktop OS is a choice), and as specialized network devices with capability of VPN technology.
Accessible modes of communications: point-to-point interaction (host communicates with a single host), or bundling entire subnets to deploy a bigger one (with complex routing modifications).
OpenVPN is widely utilized VPN implementation and the protocol name.
It’s a cross-platform software running on many operating systems.
GNU GPL license allows usage by commercial organizations.
The publication is aimed to demonstrate simple installing and configuring OpenVPN on host with Ubuntu using parameters sufficient for safe usage.

Some explanations before proceeding
OpenVPN heavily relies on correct PKI work — its main purpose is producing keys and issue\sign\revoke certificates. For simplifying these processes script “easyrsa” if often applied — it’s approach to prepare Certificate Authority (CA).
It`s assumed the encryption is in asymmetric mode where private (for encrypting transmitted packets) and public (for decryption) keys are placed on every host.
Hosts recognize (authenticate) each other prior interacting meaning proves must be provided to confirm every host is permitted to communicate. Sharing public keys allows ensuring the recognition.
This way also assumes a single host has to receive public key from all hosts reside in the network for authentication (plus secure packets exchange of course).
Just imagine really big network with hundreds of hosts and apparently quite difficult to maintain exchanging of public keys (taking in account — fake key can be provided by malicious user).
Instead, CA as another party participates in the interaction where other hosts trust it.
CA’s role is handling certificates requests - its purpose is processing certificate issuance request for each public key. Processing means CA issues and sings host’s certificate with applying its own certificate. Hosts getting CA’s certificate with the config — that’s why they trust it.
Based on explanations above these entities are required:
- CA’s private key and certificate;
- Server's key, certificate of a public key signed by CA;
- Client’s key, certificate of a public key signed by CA;
- Separate file generated accordingly with Diffie-Hellman protocol. Applying such a file makes it difficult for an intruder to decrypt the packets he managed to intercept when compromising the private key;
- Special HMAC key as an advanced security option. Its purpose is protection against various kinds of attacks.
Installation
Ways of OpenVPN installing:
- From source code;
- From Ubuntu repository;
- From developers' repository (Community Edition).
It is recommended to update software by using package manager, hence installation from source code is not a best choice.
Ubuntu repository is missing fresh version of the software.
OpenVPN developers maintain dedicated repository with fresh versions and updates, so considering it as more suitable.
Adding developers` repository (all commands are run by root):
-
- Import GPG key:
curl -fsSL https://swupdate.openvpn.net/repos/repo-public.gpg | gpg --dearmor -o /usr/share/keyrings/openvpn-public.gpg-
- Place new source for apt package manager:
echo "deb [arch=amd64 signed-by=/usr/share/keyrings/openvpn-public.gpg] https://build.openvpn.net/debian/openvpn/stable jammy main" > /etc/apt/sources.list.d/openvpn-repo.list-
- Install software with their dependencies:
apt update && apt install easy-rsa openvpnCA preparation
-
- Create subdirectory with related CA content:
make-cadir /etc/openvpn/ca && cd /etc/openvpn/ca && ./easy-rsa init-pkiAfterward, private keys “.key” appear in “pki/private” directory, issued certificates ".crt" in “pki/issued”.
-
- Before starting, “easyrsa” script reads the file named “vars” — it stores needed variables names with its defaults. You are free to change values having previously uncomment the corresponding entry.
Example of modification:
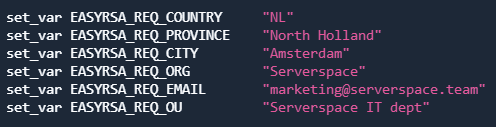
Variable EASYRSA_CA_EXPIRE defines how many days CA key is valid — default is 3650 days (or 10 years). Provide here new value if needed.
Similarly, EASYRSA_CERT_EXPIRE defines CA certificate validity period.
The file also contains explanations for every variable as comments.
-
- Get generated CA private key and certificate:
./easy-rsa build-caImportant recommendation: set a complex passphrase when appropriate request appears — passphrase adds difficulty of using key when it’s compromised.
“Common Name” — press Enter (means continue with suggested in square brackets), or provide desired name.
Result of script run — private CA key saved as “ca.key”, CA certificate — “ca.crt”. Never send the key to anyone, keep in secure place!
-
- Generate Diffie-Hellman file (this process could require two or three minutes):
./easyrsa gen-dh-
- Generate HMAC key:
openvpn --genkey secret pki/ta.keyKey and certificate for the server
-
- Generate private key:
./easyrsa gen-req serverspace nopass“nopass” allows getting a key with no pass phrase. Otherwise — systemd will request passphrase before every service start. Don't type “nopass” in case your security policy demands passphrase.
Provide desired name once “Common Name” request appears, e.g., Serverspace.
Result — private key “serverspace.key”, certificate issuance request “serverspace.req”.
-
- Issue and sign the certificate:
./easyrsa sign-req server serverspaceBefore signing the system requests confirmation of provided data “Confirm request details:” — confirm it with word “yes”, right after — provide pass phrase for CA private key.
Result — certificate “serverspace.crt”.
-
- Combine the files in one directory:
cp pki/private/serverspace.key pki/issued/serverspace.crt pki/dh.pem pki/ca.crt pki/ta.key /etc/openvpn/server/Server’s config preparation
Create new file /etc/openvpn/server/server.conf and place there:
port 1194

proto udp

dev tun

mode server

ca ca.crt

cert server.crt

key server.key

dh dh.pem

tls-auth ta.key 0

server 172.16.61.0 255.255.255.0

push "redirect gateway def1"

push "dhcp-option DNS 8.8.8.8"

ifconfig-pool-persist ipp.txt

keepalive 10 120

comp-lzo

persist-key

persist-tun

status openvpn-status.log

log openvpn.log

log-append openvpn.log
Port leaves as default – 1194, udp traffic (tcp is could be used in specific situations), subnet and DNS are defined, compression is enabled.
There are other parameters are available — their usage depends on the terms of the task.
Start OpenVPN server
-
- Enable and start systemd service:
systemctl enable openvpn-server@server.service --nowRight after start additional network interface “tun0” has to appear. Command “ip a | grep tun0” can check if it’s so. If “tun0” is up — the service running correctly.[/code]
-
- Allow sending packets between interfaces:
sysctl -w net.ipv4.ip_forward = 1 >> /etc/sysctl.conf

sysctl -p-
- Add new entry in IPTables to employ NAT:
iptables -t nat -A POSTROUTING -s 172.16.61.0/24 -o enp0s5 -j MASQUERADEProvide interface name that supposed to receive client connections instead of enp0s5.
This entry will disappear after OS restart.
To get it persistent small executable can be started right after network is up. Create file named 50-ifup in /etc/networkd-dispatcher/routable.d/ and add:
#!/usr/bin/env bash

if [[ "$IFACE" == "enp0s5" ]];

then

iptables -t nat -A POSTROUTING -s 172.16.61.0/24 -o enp0s5 -j MASQUERADE

fi
Make file 50-ifup executable (permissions 755).
Client’s key and certificate
-
- Generate key for a client:
./easy-rsa gen-req myclient1-
- Issue and sign the certificate:
./easyrsa sign-req myclient1The script will request confirmation — type “yes” to confirm, after that also provide pass phrase for CA private key.
New client’s certificate — “myclient1.crt”, key — “myclient1.key”.
Files mentioned below are needed on a device where client connection is supposed to be created:
- ca.crt;
- myclient1.key;
- myclient1.crt;
- ta.key.


