How to Install LAMP Stack on Ubuntu 20.04
LAMP is an acronym, it is a set of open source software that is usually installed together to host dynamic websites and web applications written in PHP. The Linux operating system works with the Apache web server. Site data is stored in a MySQL database, and PHP is responsible for processing dynamic content.
In the Serverspace you can create a server with already installed app "LAMP".

In this tutorial, we will install the LAMP kit on the Ubuntu 20.04 server.
Step 1 – Installing Apache
First, let's update the packages in our system and install Apache.
sudo apt update

sudo apt upgrade

sudo apt install apache2
If you have a firewall enabled, you need to allow HTTP and HTTPS traffic. To display the available application profiles, enter the command.
sudo ufw app listTo allow unencrypted connections on port 80, there is an Apache profile. Apache Secure will only open encrypted (TLS/SSL) traffic on port 443. To allow both types of traffic, select Apache Full profile.
sudo ufw allow "Apache"Now let's check if the web server is working. Open the IP address of your server in a browser.
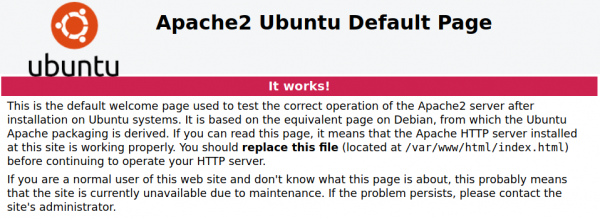
http://your_server_ipIf everything is well, you will see the Apache2 Default Page with basic information about the web server.
Step 2 – Installing MySQL
MySQL is the most commonly used database management system for dynamic websites. Let’s install it.
sudo apt install mysql-serverTo improve the DBMS security right after installation, there is a special script that changes some MySQL settings.
Enter this command and follow the instructions.
sudo mysql_secure_installationAfter completing the configuration, let's log in to the MySQL console.
sudo mysqlMessage “Welcome to the MySQL monitor” means that the MySQL server is running.
Step 3 — Installing PHP
The PHP package processes the code and generates the final content for users. You will also need the php-mysql package for interacting with MySQL databases and libapache2-mod-php for interacting with Apache. Let's install them.
sudo apt install php php-mysql libapache2-mod-phpTo make sure that PHP works and find out its version, use the command:
php -v

PHP 7.4.3 (cli) (built: May 26 2020 12:24:22) ( NTS )

...
We have installed all the elements of the LAMP kit. In the next steps, we will create a virtual host and test the functionality of the entire bundle.
Step 4 - Creating a virtual host
On the Apache web server, you can use virtual hosts to serve multiple sites on the single server. We will use the domain my-site.io as an example. You need to replace this address with your domain name.
By default, Apache processes the contents of the /var/www/html directory. If you do not have a domain name yet, you can use the default folder for testing. The site will be accessible via the server's public IP address over the HTTP Protocol.
If you already have a domain name, let’s create a new directory for it – var/www/my-site.io. In addition, let’s set the current system user as the owner of this directory.
sudo mkdir /var/www/my-site.io

sudo chown -R $USER:$USER /var/www/my-site.io
After that, you need to create a configuration file for this domain in the directory /etc/apache2/sites-available/ and add the main settings to it.
sudo nano /etc/apache2/sites-available/my-site.io.conf

#Basic virtual host configuration

<virtualhost :80="">

ServerName my-site.io

ServerAlias www.my-site.io

ServerAdmin admin-mail@localhost

DocumentRoot /var/www/my-site.io

ErrorLog ${APACHE_LOG_DIR}/error.log

CustomLog ${APACHE_LOG_DIR}/access.log combined

</virtualhost>
To activate the newly created virtual host, enter:
sudo a2ensite my-site.io

sudo apache2ctl configtest

systemctl reload apache2
Now you have configured Apache to process files from /var/www/html by default or from /var/www/my-site.io, if you already have a domain name. This is the root folder of the website. Create index.html file there and put some content in it.
#default directory

nano /var/www/html/index.html

#or my-site.io directory

nano /var/www/my-site.io/index.html

<h1>My first web site!</h1>

Some text here.
Than enter your domain name or server IP address in the browser's address bar:
http://my-site.io

or http://web-server-ip-address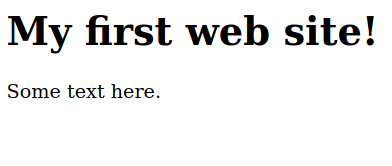
If you see your content there, everything works fine.
Step 5 – PHP testing
To test PHP processing, create a file test.php in the site's root folder.
nano /var/www/html/test.phpPut this PHP code in it:
<!--?php phpinfo();?-->Now just add “/test.php” to your site address from the previous step:
http://my-site.io/test.php

or http://web-server-ip-address/test.php
You will see something like this:
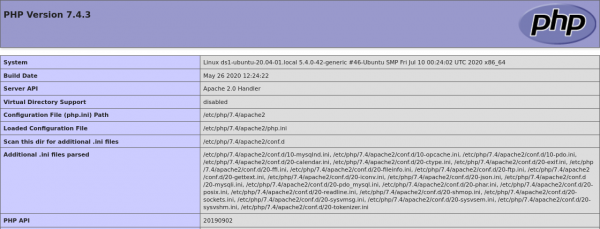
This is a PHP service page that contains information about various settings. If you can see this, everything works well.
After testing, you should delete this page, since it contains confidential information about your server:
sudo rm /var/www/html/test.phpWe now have a working LAMP server.


